Wednesday, June 24, 2015

National Parks Blog Hop-Mogram Cards

Welcome to the June Edition of the Club Scrap Blog Hop. I am glad you found your way here.  If you found your way from Annette awesome.  If you stumbled upon me by accident, awesome too!  But do yourself a favor and head on over to the beginning at Club Scrap's blog.

I switched to Club Scrap Lite.  NOt sure why.  It has lasted all of two months.  I went back to the Deluxe Starting next month.  And to top it off I was not receiving stamps with my Lite kit, which leaves me at a loss, especially when I have less than 10 days from the time I receive my kit to the Blog Hop.   Add a week long business trip and I feel rushed and uninspired.

With no kit stamps and really making an effort in trying different techniques, this month I decided to try and make a set of three monogrammed cards using the Club Scrap June Kit titled National Parks.

The first is just a simple collage.  the tag I created from t he lite kit cut outs sprayed with some yellow memory mist.   The butter fly stamp is from Club Scrap Papillon and fussy cut from the National Parks yellow card stock.  the sentiment is also from the Papillon kit.    The ribbon is from the National Parks kit.   I used the white/oatmeal card stock as a base and did a wash of red Faber Castell gelato.  The S was from my stash.  


Next I wanted to try my hand at an embossed monogram card.   everything on this card is from the National parks kit.  I used the Club Scrap Alpha stencil  and a Stylus to emboss the S onto the card stock (although it does not look like it, that is a raised S).

I think the next is my favorite and I already envision using this technique for some Christmas Cards.  I used National Parks card stock as my base.   Grabed soem green water color and washed the base with the green water color.  I then took some white water color and added to the top.  I grabbed the noise stamp from  the Aurora Borealis kit and masked off an area on the front of the card.  I stamped the noise with embossing ink and embossed in gold.  I grabbed and S from my unmounted font stash and stamped with embossing ink and also embossed with gold powder.  For some added bling I added some jewles within the embossed noise stamp. 


It is pretty easy to think and create outside the box using what Club Scrap provides us inside the box.  I love how the kits are always so versatile.

Next up is Cat C.     Hop on over to see what she has created this month by clicking here.

Thanks for "hoppin:" and see you next month!


Wednesday, April 29, 2015

Club Scrap Botanicals Blog Hop


Welcome to the April edition of Club Scrap's Blog Hop.  If you found your way from Annette's Blog you are in the right spot.  If you stumbled upon me, I am glad you are here.   This month we are featuring the Botanicals collection from Club Scrap.  

I got to this one late due to a family emergency calling me out of town, and almost bowed out, but I missed last months because of an eye issue, and I thought well if anything I can show how fast and easy something fun can come together.

Basically I decided to play.  I grabbed my collection of all sorts of water color type mediums (twinkles, sparkling H20 and my Reeves water colors).   I grabbed a cup of water and a brush and some water color paper.

I trimmed my water color paper to 4 x 5.25 then I grabbed my colors and my brush and I played with combinations of complimentary colors and washed the paper and splattered it.    I used extra water so when I stood my papers up to dry the water would drip creating a neat effect.

When dry I used a variety of stamps from the Botanicals collections to decorate in coordinating colors.

I use the pink and brown card stock from the collection as the card base.


Some pinks, purples and corals. 


Some blues, greens and yellows.

Tied up with a cord to give as a gift

Something so simple, fun came together so beautifully.

Hope you enjoyed.

If you have not enjoyed the entire hop start at the beginning at Club Scrap's Blog. 

Hope to se you next month.


Wednesday, February 25, 2015

Life is an Adventure Shadow Box Frame

Welcome Welcome to my entry into the Club Scrap London Calling Blog Hop.  If you found your way from Kay's blog you are in the right place and I am so excited you are here. If you stumbled upon my accidentally do yourself a favor and start at the beginning by visiting www.clubscrap.com/blog.

Sort of kinda unintentionally our house has been filling  up with bicycle decor.  I do not suppose it has anything to do with the fact that 3 out 4 in our family are triathletes, and the only exercise the other one enjoys of the three triathlete disciplines is cycling.  We have gravitated towards the vintage looking cycles EXACTLY like the one found on the London calling Art Nouveau unmounted stamp collection.   Our house has a long bay of square window  box windows int he living room that that sets itself up for a large display of just stuff, photos, inspirational plaques, a large vintage bicycle clock and a shadowbox frame.  

This really was quite simple to make.

I grabbed the following items:
  • Two pieces of some sort of cad board.  I sued the inserts that come in calendars, they are a little bit thicker than cereal boxes but not nearly as thick as book board. 
  • Coordinating paper/card stock from Club Scrap's London Calling Collection
  • A handful of baubles and embellishments
  • London Calling Art Nouveau unmounted stamp collection
  • Some sprays
  • Washi tape
  • Foam Tape
  • Pop dots
  • Club Scrap Bookbinding glue
  • Club Scrap Grid Ruler
  • Craft Knife


  1. The dimensions of my frame are 5"x6.25".  I used my Fiskars guillotine trimmer to trim both pieces of cardboard down to these dimensions. 
  2. I chose the paper I wanted on the frame and went ahead and glued that on one of th3 5" X 6.25" pieces of  cardboard using Bookbinding Glue so I would only have to cut once.
  3. this piece and measured out the frame opening.   I knew I was going to use an inside image of approximately 3" x 4" so I  marked out a 3.5" x 4.5" opening using my grid ruler and a pen.  
  4. I used my grid ruler and a sharp craft knife to trim out the frame opening. 
  5. Next I chose my background paper to cover the inside background of the shadow box frame which was just the light green card stock.  I trimmed this to 5"x6.25: and adhered to the background piece of cardboard.   
  6. I knew I wanted the saying "Life is an Adventure, Enjoy the Ride" as part of  my shadowbox frame.   My  initial thought was to have it form a frame along a 3" x 4" and stamp the circle inside.   However I have very limited digital capabilities and was  unable to make that happen but was able to use the saying to form a circle in the Iscrapbook program using the curved text feature.   I also used the Collection Font Chancery Cursive for the saying (found in the scrap rap posts always posted the first of the month).  I printed my circle out this out on cream card stock and trimmed the paper to 3"x 4" with the circle in the center.  
  7. I sprayed my printed image with green memories mist and blue glimmer mist
  8. By nothing more than some serendipity that circle text image was jsut the right size for me to punch a circle out using the only circle punch I own.  The circle punch was the perfect size to stamp the cute little bicycle image on. I adhered my punched cirlce inside of the "Life is an Adventure" image with pop dots. 
  9. Using foam tape, I placed a double layer on the outer frame to give it extra dimension (notice the washi tape, because I am a horrible craft knife cutter, I used the washi tape to hide the uneven trim job). 
  10. I turned this over and adehered it onto my background
  11. Once the frame was in place, I put some adhesive on the back of my 3"x4" image and centered it within the frame.   
  12. Now that the frame was together, I played around with the baubles until it looked blanaced to me. 
  13. And here it is on my window box with Ragnar the cat keeping watch (he has a thing for Club Scrap apparently).


 Now go visit Julie Here at Cape Cod Scrapper and see what she came up with.

Don't forget to join us next month for another blog hop!

Have a great day!


Friday, February 20, 2015

A Fun{stache}tical time playing with the Mustache

The Club Scrap London Calling kit had some really awesome images on the unmounted stamp plates. this month.    There are Tea Cups, Bicycles, Mustaches, Hats, Cars, Buses, and so much more.   I fell in love immediately with the bicycle.  However, today I had to sit down to make a birthday card for my brother and the mustache was the image I knew I was going to use.  OH my, I fell in love with this simple little image.   And I started playing.   Its amazing the variety of cards you can get out of this little image.

The first one I made was my brothers card,  I will say I was inspired by a card I saw on Pinterest found here.   

It just so happened that Club Scrap London Calling unmounted Borders and Backgrounds unmounted stamps had a cute little hat on it.  The collection unmounted stamps found on the Club Stamp kit had the cutest mustache.   I grabbed some Club Scrap paper I had in my stash and a Club Scrap India Ink Ink Pad  and got to creating and here is what I came up with, my own little Monocled mustached gentleman.:


 Then, inspired by Tiare Smith who uses each months collection to create Christmas Cards every month, I set out to create a Christmas Card with my little mustache.  Here is what ensued:


The card base and the cream paper is paper from my Club Scrap stash.  The red patterned paper is from my Christmas themed paper.  The Mustache is from London Calling Kit and the Ho Ho Ho is from a "Vintage" Club Scrap Christmas Collection who's collection name escapes me.  The inks I used were Club Scrap Ruby and Moss hybrid ink pads.


Last year when Club Scrap was moving I ordered one of those large mystery boxes.  I received lots of greeting to go component kits without the tags and cut outs.  I grabbed one of those and decided to make a masculine card for my pops.    It came together really, really well.  The "father" stamp is from Stampin up and the script background stamp on the background banner is from Club Scrap's London Calling Greetings art nouveau stamps.  I used Club Scrap indigo Ink, earth and ash hybrid ink pads:


Be sure to join us on February 25th for a London Calling Blog hop.

Hope you enjoyed,  Thanks for Looking.

Sunday, February 8, 2015

Club Scrap Constellations Paper Mosaic


I was so excited to try my hand at a paper mosaic with he Club Scrap Constellations kit.  I knew immediately when I saw it I wanted to use the black print and silver beads.    I'm quite pleased with how it turned out.  I basically just cut along the concentric circles of the print.  You can see my original post utilizing this technique with  with the Club Scrap Reunion Kit and the steps I took to create it  here


Here is a close up of the micro beads:


These are really a lot of fun to make, and I am hoping to make one for each Club Scrap Monthly kit.   


Thanks for looking!   

Shona

Wednesday, January 28, 2015

Club Scrap Constellations Blog Hop.


Welcome to the monthly Club Scrap Blog Hop.  This month we are featuring the kit Constellations.   I love this kit, the colors, the sentiments, just everything.  I loved it so much so, I had a real hard time wanting to cut the paper for a project,  so I utilized the digital kit.

First thing first,   if you stumbled upon me and have not visited the rest of the hop you can start from the very beginning by going here:


 and then proceed to hop on through.   There are some amazing artists that participate every month.  I am always blown away by their creativity!

No onto my project.   If you know me, you know I am a runner an a triathlete.  There are all sorts of smart phone apps to track my runs and my bike rides etc, but I like things all in one place and handy at a glimpse.  I also think I am a little "too connected" sometimes and I love the feel of paper in my hands and I love to write,  so I decided to make a workout log.   Well actually a friend of mine posted a picture on her Facebook page asking one of her friends to make her one, and the light bulb went off

Here is what originally inspired me:


Here is my finished version, with a little about the insides afterwards:


Since I swim Bike and Run I modified the pages a little bit.  The pages were created in a word processing document.   I added a page for races I compete in along with a page to record time trials so I can see my improvements (or lack thereof) on a glance:


When I open the book and lay it flat, an entire 7 days is visible on a two page spread.


The cover art is created from the Constellations digital page.  I love that quote and thought it was fitting.     I added my favorite photo of me running...dunno, just really like that one.   The inside pages are simply an 8.5 x 11 sheet folded in half which makes for a 8.5x5.5 book.    The "open" end is where I binded the pages.    Here is a sample of the Word document for one page:


I had some card board laying around.  I trimmed two pieces to 8.5 to 5.75 inches for the cover.  I wrapped the front cover int he Constellations red, and adhered my cover art.   I left the back cover naked.


I  used my handy dandy, rusty old Zutter Binder tool to put it all together.

Now for a treat click here to visit Julie Heyer at Cape Cod Scrapper.

See you next month!

Shona


Wednesday, December 31, 2014

Club Scrap Reunion Blog Hop

Welcome to the December edition of Club Scrap's Blog Hop.

If you happened upon me, please do yourself a huge favor and start at the beginning at Club Scraps Blog and explore all the talented Artists who are participating in this months blog.  You can find the Club Scrap blog here:


It's been a while since I have been able to participate in one of these.   I am so glad I had a chance to this month.  I have been playing, playing, playing in my craft room.


I did two projects this month.   First I want to show you how easy Club Scraps coordinated kits can make throwing together a tribute album.


 I have been wanting to make a tribute Album for my mom for a little over a year now, and life kept getting int he way.   I had taken Big Picture Classes Tribute Album Class while back and the one thing those folks are so good at is the coordinated look.   I have about zero capability of throwing together colors and and patterns and other elements to pull a theme together.   That's where Club Scrap comes in.

To get the content of the album I invited all our family (aunts, uncles, cousins, brothers, sisters etc) to contribute memories about my mom, or their favorite things.  I also invited a few of mine and my brothers friends who she "took in" (sometimes literally) in their teenage or college years to contribute.    The images and colors and sentiments that came with the Club Scrap's Reunion kit were a perfect fit for the feelings and sentiments I wanted to convey to my mom.  I kept it very simple, no major embellishments on the pages, just a background page, a photo matte and a coordinated strip between the photo and the memory.  Here are just a few of the pages.

In Hindsight a gnome would have been a perfect addition to this page


Finally I put together a cover and a dedication page using Reunion Elements:


It is just so easy to put together something that looks so amazing using the coordinated items Club Scrap puts together for  us.  I love that they are so talented so I do not have to be, but it looks like I am.

My next project was inspired by a project I saw in the magazine Cloth, Paper Scissors Nov/Dec issue by an artist named Geri deGruy.   You can check out her page here:

 http://geridegruy.com/dataviewer.asp?keyvalue=21770&page=Blog&Topic=mosaics

The project was a mixed media mosaic using paper.  I thought it would be fun to create a grouping of these  and hang in my craft room.

I used the following:

  • Grafix double  tack mounting film
  • Several different sheets of paper from the Reunion collection
  • The sand that came in the Club Scrap by the sea shore kit a long long long time ago  
  • Gold Micro Beads
  • 6x6 wrapped canvas
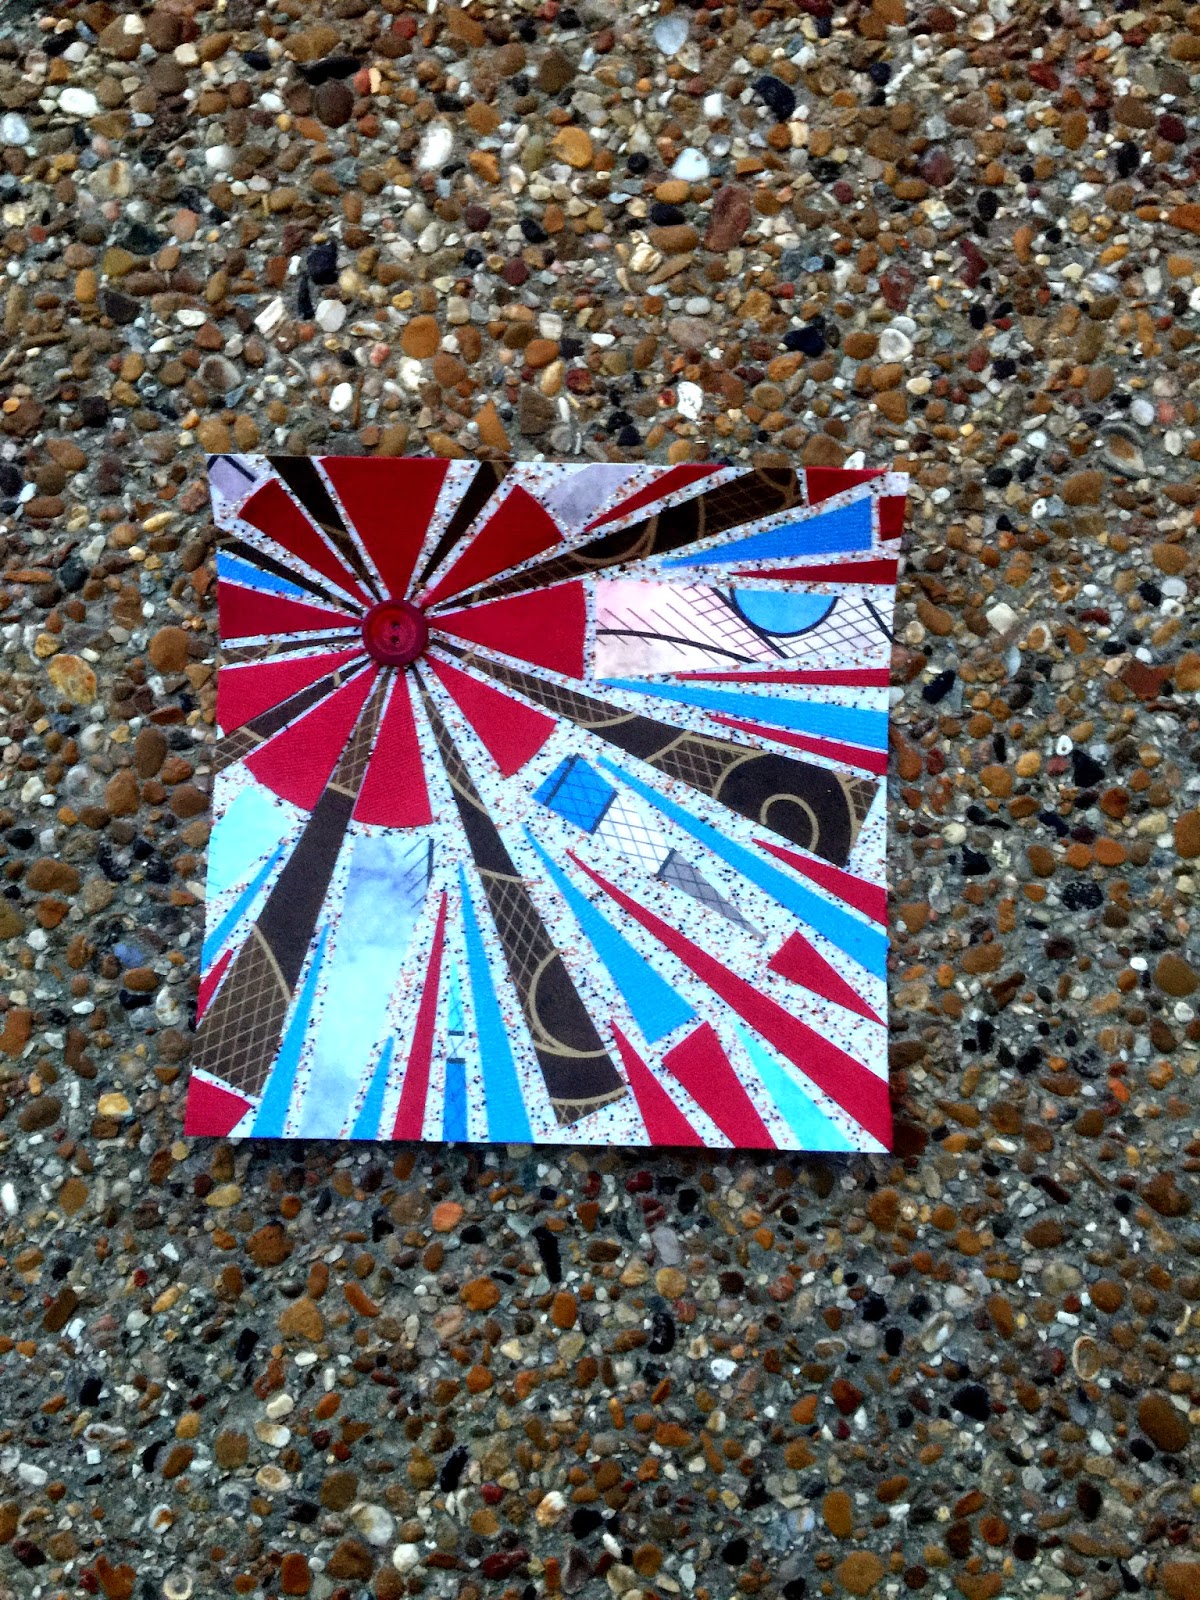
For my first creation I basically copied the artists sunburst design she demonstrated in the magazine.   I cut a 3" circle out if reunion red and cut it into wedges.  From the remaining papers I cut long thing triangles of varying lengths.

Before placing on the tack paper, I played around with a design on a 6"x6" piece paper, when I was happy with it I cut a sheet of double tack film to 6"x6".   I peeled off  the protective paper from one side of the double tack film and then laid out my design on the sticky side.

 When I was finished laying out all my paper pieces, I poured the sand in the empty spaces, this created the mosaic effect.


I then trimmed off thepeices hanging off the 6" x 6" paper.


Here is the close up of the sand "grout"

I spray painted the edges of my wrapped canvas gold and then tore off the remaining film and adhered my creation to my canvas


I created a second piece after running to the store to purchase gold microbeads (since I did not have any) thinking I might like that  look better.    I also switched up the "sun" part but stuck with the sun burst design for fluidity.  Here is the second piece (sorry about photos, it was dark outside so I had to shoot indoors)


This was a fun fun project.  I encourage you to try using your paper for projects like these every once in a while.

You have reached the end of this month's blog hop.

If you missed  a few artists you can star back at Club Scrap's page and hop through.


Join us next month when we will be featuring the Kit Constellations.  

Happy Crafting.